Sunday, June 12, 2011

Hand Care Tips


Tips for getting Soft Hands

handcare tips So your hands don't feel soft any longer?

Don't worry there is an option for getting a soft hands.

1.Before you go to bed, lavish on by Vaseline and after that pop on a pair of cotton gloves. Your hands will be amazingly soft by morning.

2.Do not let the skin on hands dry and moisturize them often to keep off the winkles.

Use your face cream on

Ankle and foot tattoo Designs

Ankle and foot tattoos have been around for a long time and are a very popular among women. This trendy tattoo looks superb during the spring and summer time.

Here are few ankle tattoo designs that will help you to find some great ideas..

Leg Design


Ankle Designs


Ankle to Foot Designs


Fashion Updates

Check the latest outfits...


Beautiful Hair


How to get and maintain a healthy head of good-looking hair

There are three main things that needed for a good-looking head of hair - haute hair - good health, the correct attention to cleanliness, and care when using cosmetic treatments. To achieve and maintain a healthy head of beautiful hair there some essential things to work out for it. These suggestions will be very helpful for to attain a healthy head of beautiful hair.

1. Adequate Diet

Hair growth depends on an enough diet. A general diet problem which causes loss of hair is iron deficiency Anemia. The reason is too little iron in blood, brought on by a diet containing too eggs, little meat, cereals or peas and beans. Fresh fruits and vegetables are also required to give vitamin C, which enables the body to absorb iron.

2. Cutting the hair

Even though cutting the hair is not necessary to its well-being, it is easier to keep the scalp clean if the hair is kept sensibly short.

Tips For Lip Care


All About Lip Care
lip care
Normally make-up to the lips is given huge importance than lip care. This is not the correct attitude because lips need a little care as their protecting layer (the skin of lips is too thin) is extremely thin and like other parts they do not contain sweat glands and not many oil glands thus they are prone to dryness. Cracked dry lips are painful, can develop infections and are not good to look at.
Why lips turn dry?
  • Inadequate water intake to keep your skin hydrated.
  • Smoking.
  • Continuous exposure to sun, dust partials can also cause dryness.
  • Licking your lips often can cause dry lips.
  • Deficiency of vitamins A, B and C.
  • Intake of excess of Alcohol and caffeine removes moisture and causes dryness.
  • Some times cosmetics also contribute to dry lips.
Tips for Beautiful Lips
  • Drink atleast 8 glass of water everyday, this makes a lot of difference to your lips.
  • Use lip balm especially to protect them from sun rays, to prevent moisture loss. Lip balms contain petroleum jelly that prevents moisture loss.
  • While you brush your teeth, gently move in circular motion with the brush on your lips this removes dead cells.
  • Eat healthy food that contains vitamins A, B and C.
  • Avoid Smoking, excess of Alcohol and caffeine.
  • Avoid cosmetics that are allergenic to your skin.
  • Black lips usually show one's careless lifestyle in spite of having been blessed with a perfect skin and figure. Having naturally shadowy colored lips from birth is totally fine.
Why lips turn dark?
  • Smoking.
  • Intake of excess of Alcohol and caffeine.
  • Cosmetics products of cheap bands.
  • Heavy application of lip sticks, lip liners.
  • Dryness.
Remedies for Dark Lips

Homemade FacePack

homemade face pack
Facial At Home
Before applying a facial mask follow these steps :-
Use a cleanser ( Lotion or milk cleansers for dry skin & Gel cleansers for oily skin) to remove the dirt.
Then exfoliate with a mild scrub that contains exfoliates that are round and non-abrasive.
And then apply a facial mask that suits your skin after exfoliating.
Face Packs for Dry Skin
Note for Dry Skin: - Always wash your face with lukewarm water; do not wash with hot or cold water. While making face packs do not add water as an ingredient, you can add rosewater instead of water. Do not use soap to clean the mask.

Eye Makeup Tips

Tips for Younger looking eyes

eyemakeup tips The first way is to lessen fine lines. So apply a little eye cream on the brow bone and below the eye. After that dab on a concealer, that goes with your skin tones.

The very last step is to line the eye with a white pencil just beneath the lash line. This will give the impression of better and brighter eyes.


Eye Makeup Tips for glamorous look:

• To cover the dark under eye circles, apply three dots of concealer under each eye. First start at the inner corner, then under the pupil and the third on the outer edge.

• Apply eye base to your lid, which is the secret of keeping your shadow in place for hours.

Eye Care Tips

Effective Tips for Eye Care


eye caretips The below mentioned eye care tips helps you have an healthy and beautiful eyes free of eye wrinkles and dark circles around the eyes.
1. Apply a thin coat of castor oil on the eyelashes and eyebrows every night. It strengthens eye lashes and cools the eyes.

2. To reduce puffiness of your eyes, Crush a cucumber and take the juice. Add a little rose water and apply around the eyes and wash it after 20 minutes.

3. Immerse wads of cotton in a cooled mixture of cucumber and potato juice. Keep this on your eyelids for 15 to 20 minutes and gently wash it off. Apply a little baby oil. Put sliced cucumber over your eyes to treat dark circles.

4. Eat plenty of fruits and vegetables like carrots, drumstick, spinach., papaya and mangoes. All these are rich in beta carotene which helps to have healthy eyes.

5. Take adequate rest. Rest will refresh the eyes and help them work more efficiently.

6. Exercise regularly to improve blood circulation. Only then your eyes are sure to receive enough oxygen for good performance.

7. Regularly apply oil mixed in glycerin to your eye lashes and eye brows to keep them dense and dark.

8. Always use sunglasses during the peak day time to protect your eyes from sunrays. Direct sunrays cause heavy damage to eyes.

9. Put a slice of potato or cucumber on both the eyes, after 10 minutes remove and wash the eyes. This helps to avoid under eye wrinkles and dark circles around the eyes.

10. To avoid any kind of puffiness in your eyes drink minimum 12 glass of water.Drinking lots of water helps to flush out waste from the body.

11. Do not rub your eyes for any reason but instead just blink your eyelids. Blinking is a good massage and exercise to the eyes.

12. Take A vitamin diet to make eyes brighter. (papaya, eggs, fish, milk, cilantro etc.,) Wash eyes with cold water to get sparkling eyes.

13. Soak amla overnight in water and use this water the next morning to wash the eyes.

14. Soak cotton in Luke warm milk and cover eyes with it for 15 min.

15. To soothe tired eyes, dip cotton pads in chilled milk and place on closed eyes for 10 minutes. Now relax completely.

16. To completely relax the eyes and the surrounding muscles, close your eyes and think of something that is pleasant or soothing and at a distance. Now gently open your eyes and look into the distance. Next focus on an object at arm's length. Do this extremely relaxing exercise four or five times a day.

17. For Puffy Eyes: Grate a potato with its peel and apply on your closed eyelids for about 20 minutes and relax completely. You may even take a nap.

18. Wash your face before sleeping, and ensure that there is no make-up on your face before you sleep, because, make-up creams may spoil your face as it will be there for the whole night. It is better if no cream is applied. What I feel is, wash your face before sleeping and if at all you want to apply any cream, just apply night cream and none other than that.

For Firm Skin....

 To get firmer skin, take a egg white, add little sugar to it. Wisk it and apply on face and neck. Leave for 10-15 minutes. Wash off with Luke warm water. This prevents fine wrinkles and gives a firmer skin.

To Get Shiny Hairs

To have healthy shiny hair, treat your scalp with a mixture of almond oil and olive oil, leave for 10-15 minutes and wash your hair. This also reduces hair loss. You can also wrap a hot towel over your head for the oil to seep in easily and also to open all your pores.

Wednesday, June 8, 2011

Easy Summer Makeup Look


Step 1: Prep

Prep your skin by starting off with a clean face. Apply a light, oil-free moisturizer and massage it in circular motions. Once the moisturizer has completely melted into the skin, apply a good primer which will ensure your concealer/foundation will stay put. You should also prep your eyes by applying an eye primer onto your lids.

Step 2: Flawless Finish

If you have perfect skin, just use a good tinted moisturizer to get a perfect, flawless finish. If you’re not that lucky though, start off by dotting on concealer wherever needed (red spots, blemishes, and dark circles). Pat the concealer in, making sure the problem area is thoroughly concealed. When it’s hot out, I prefer to skip the foundation as it can be a little too heavy. Instead, I just apply a matte powder all over my face. This will even out discoloration and put the concealer in its place.

How to do a French hair-style


french-braid


Step 1:
Start with clean hair and brush out any knots or tangles. Brush your hair back so that there is no part. Apply a frizz serum to your palms and run through hair to make sure there are no flyaways.
Step 2:
Take a part of your hair and separate it from the rest of your hair where you want to start your braid. It is best to make the part V-shaped, with the point of the V towards the back of your head. I find that this is easiest, but you can also start lower on the head or even on the side. If you’re a beginner though, just stick to these steps.
Step 3:
Now that you’ve gathered that section of hair, separate it into three parts just like you would a regular braid.
Step 4:
Now this is where it gets a little trickier, but if you know how to do a normal braid, it shouldn’t be too hard at all. Hold the left strand with your left pinkie while moving the right strand from your right hand to your left. Shift the new right strand (which was the middle strand) from your right hand to your left.
Step 5:
Add some hair from the right side of your head to the right strand. Use your right index finger to pick up a section of hair from the right side of the head and add it to the new rightmost strand.
Step 6:
Cross the left strand over the middle strand. Grab the rightmost strand with your right pinkie then rotate your left hand so that you can grab the leftmost strand in your right hand. Shift the new leftmost strand to your right hand.
Step 7:
Add hair from the left side of the head to the new leftmost strand. Use your left index finger to pick up a section of hair from the left side of the head and add it to the leftmost strand.
Step 8:
Cross the right strand over the middle strand. Grab the left strand with your left pinkie and rotate your right hand so that you can grab the rightmost strand in your left hand. Shift the new rightmost strand to your left hand.
Step 9:
Add some hair from the right side of your head to the rightmost strand. Use your right index finger to pick up a section of hair from the right side of the head. Add it to the rightmost strand which is currently held in your left hand.
Step 10:
Cross the left strand over to the middle strand. Grab the right strand with your right pinkie then rotate your left hand so that you can grab the leftmost part of your hair in your right hand. Shift the new leftmore strand from your left hand to your right hand.
Step 11:
Add some hair from the left side to the leftmost strand. Use your left index finger to pick up a section of hair from the left side of the head and add it to the leftmost strand in your right hand.
Step 12:
Continue braiding and cross the rightmost strand over the middle. Add hair to the new rightmost strand, cross the leftmost strand over the middle, add hair to the new leftmost strand, and repeat until there is no hair left to braid.
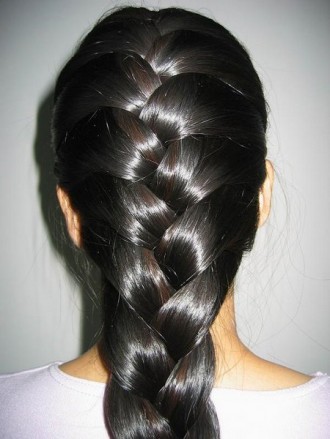
Step 13:
Braid the rest of your hair normally until there is no more hair left. Tie or clip the braid and ta-da! Easy as pie! Okay, so maybe it doesn’t sound very easy, but if you take the time and follow the steps along with a little bit of patience, I promise you you’ll be able to french braid your hair in no time!
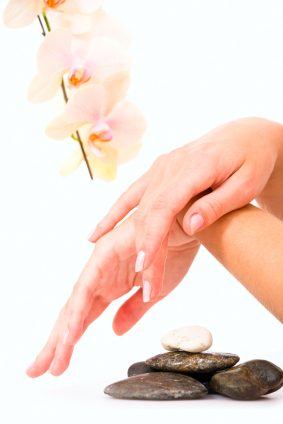